Using the Chargebee API to Create or Update Subscriptions in Python

Introduction to Chargebee API for Subscription Management
Chargebee is a robust subscription management platform that empowers businesses to automate billing, invoicing, and revenue operations. It offers a comprehensive suite of tools to manage recurring billing, handle customer subscriptions, and streamline financial workflows.
Developers often integrate with Chargebee's API to enhance subscription management capabilities within their applications. By leveraging the Chargebee API, developers can create or update subscriptions programmatically, allowing for seamless integration with existing systems and processes.
For example, a developer might use the Chargebee API to automate the creation of new subscriptions when a customer signs up for a service, or to update existing subscriptions with new pricing plans or billing cycles. This integration can significantly reduce manual intervention and improve operational efficiency.
Setting Up Your Chargebee Test/Sandbox Account for API Integration
Before you can start creating or updating subscriptions using the Chargebee API, you'll need to set up a test or sandbox account. This environment allows you to safely experiment with API calls without affecting live data.
Creating a Chargebee Sandbox Account
Follow these steps to create a Chargebee sandbox account:
- Visit the Chargebee signup page and select the option to create a sandbox account.
- Fill in the required details, such as your email address and company name, and submit the form.
- Once your account is created, you will receive a confirmation email. Follow the instructions in the email to verify your account.
Generating API Keys for Chargebee Authentication
Chargebee uses HTTP Basic authentication for API calls. The username is your API key, and the password is left empty. Here's how to generate your API keys:
- Log in to your Chargebee sandbox account.
- Navigate to Settings > API Keys.
- Click on Create API Key and provide a name for your key.
- Copy the generated API key and store it securely. You'll use this key to authenticate your API requests.
Configuring Chargebee API Access
Ensure that your API key has the necessary permissions to create and update subscriptions. You can configure these permissions in the API Keys section by selecting the appropriate scopes for your key.
Testing Your Chargebee API Setup
To verify that your setup is complete, you can make a simple API call to list subscriptions:
import requests

api_key = 'your_api_key'
url = 'https://{site}.chargebee.com/api/v2/subscriptions'

response = requests.get(url, auth=(api_key, ''))

if response.status_code == 200:
    print("API setup successful!")
else:
    print("Error in API setup:", response.status_code, response.text)
Replace your_api_key with the API key you generated and {site} with your Chargebee site name. This code will confirm if your API setup is correct by attempting to retrieve a list of subscriptions.
sbb-itb-96038d7
Making API Calls to Create or Update Subscriptions with Chargebee in Python
To interact with the Chargebee API for creating or updating subscriptions, you'll need to use Python. This section will guide you through the necessary steps, including setting up your environment, writing the code, and handling responses.
Setting Up Your Python Environment for Chargebee API Integration
Ensure you have the following prerequisites installed on your machine:
- Python 3.11.1
- The Python package installer pip
Once you have these installed, open your terminal or command prompt and install the requests library using the following command:
pip install requestsWriting Python Code to Create a Subscription with Chargebee API
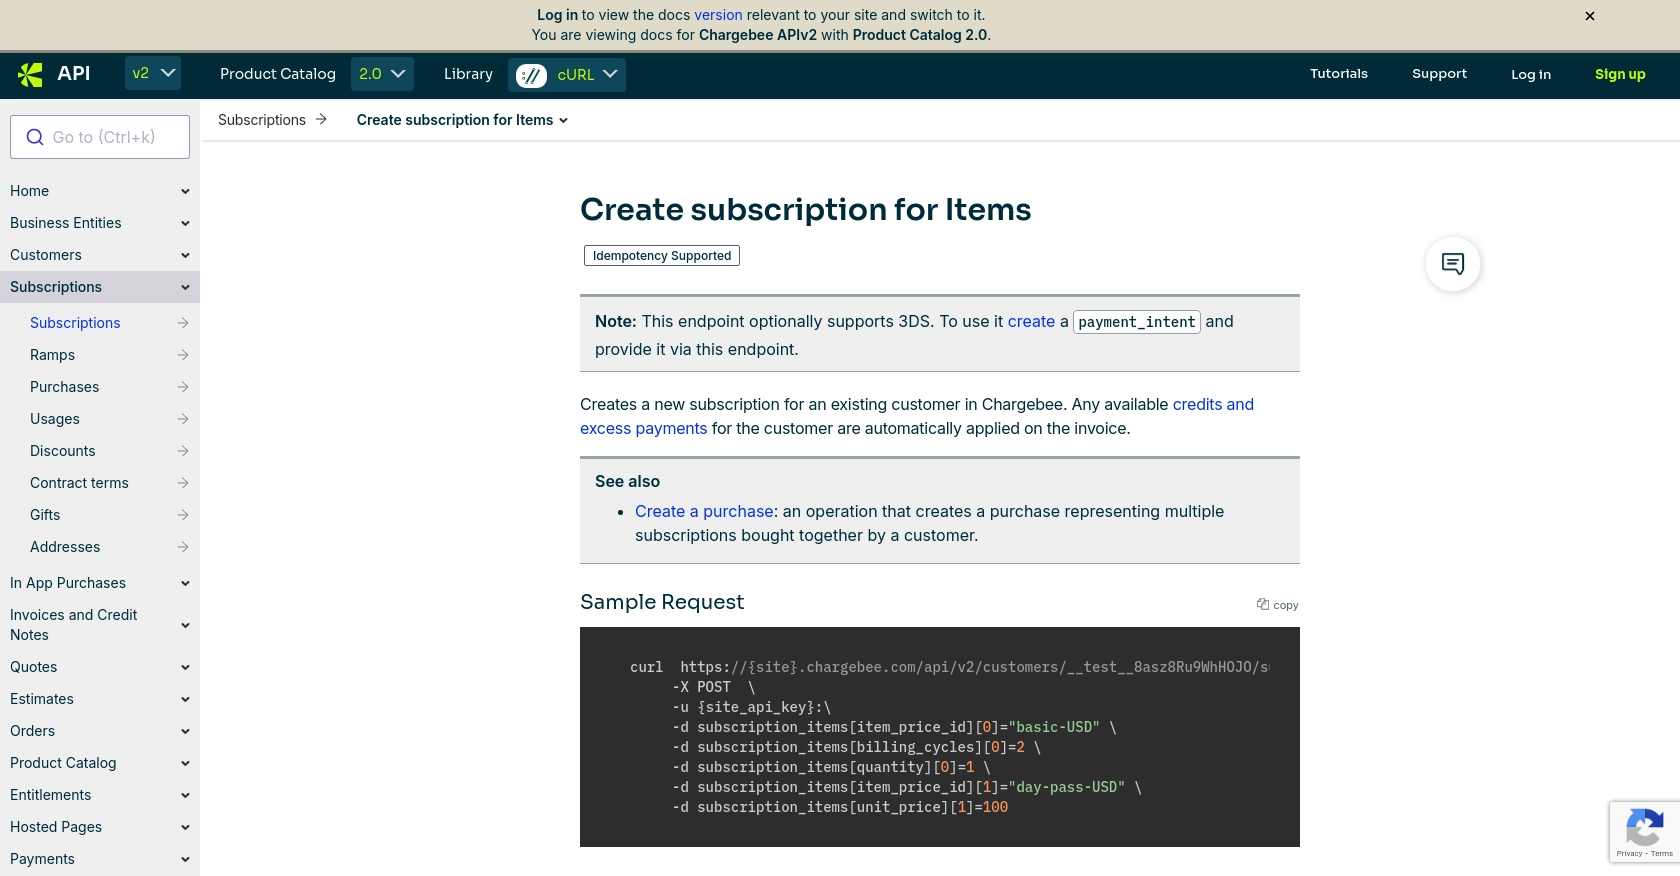
Let's create a Python script to create a new subscription using the Chargebee API. Create a file named create_subscription.py and add the following code:
import requests

# Set your Chargebee site and API key
site = 'your_site'
api_key = 'your_api_key'

# Define the API endpoint
url = f'https://{site}.chargebee.com/api/v2/customers/__test__8asz8Ru9WhHOJO/subscription_for_items'

# Set the request headers
headers = {
    'Content-Type': 'application/x-www-form-urlencoded',
    'Authorization': f'Basic {api_key}:'
}

# Define the subscription data
data = {
    'subscription_items[item_price_id][0]': 'basic-USD',
    'subscription_items[billing_cycles][0]': 2,
    'subscription_items[quantity][0]': 1
}

# Make the POST request to create the subscription
response = requests.post(url, headers=headers, data=data)

# Check the response
if response.status_code == 200:
    print("Subscription created successfully!")
else:
    print("Failed to create subscription:", response.status_code, response.text)
Replace your_site and your_api_key with your Chargebee site name and API key. This script sends a POST request to create a subscription with specified item prices and billing cycles.
Handling Responses and Errors from Chargebee API
After making the API call, it's crucial to handle the responses correctly. The Chargebee API returns JSON responses, which you can parse to check the status of your request:
response_data = response.json()
if response.status_code == 200:
    subscription_id = response_data['subscription']['id']
    print(f"Subscription created with ID: {subscription_id}")
else:
    error_message = response_data.get('message', 'Unknown error')
    print(f"Error: {error_message}")
Ensure you handle different HTTP status codes and error messages as per Chargebee's documentation. For detailed error handling, refer to the Chargebee API error handling documentation.
Verifying Subscription Creation in Chargebee Sandbox
To verify that the subscription was created successfully, log in to your Chargebee sandbox account and navigate to the Subscriptions section. You should see the new subscription listed there.
Best Practices for Chargebee API Integration
When integrating with Chargebee's API, consider the following best practices:
- Store API keys securely and avoid hardcoding them in your scripts.
- Implement rate limiting to handle Chargebee's API limits effectively.
- Standardize data fields to ensure consistency across your application.
For more information on rate limits, refer to the Chargebee API rate limits documentation.
Conclusion and Best Practices for Integrating Chargebee API in Python
Integrating the Chargebee API into your Python applications can significantly enhance your subscription management capabilities, allowing for seamless automation of billing and invoicing processes. By following the steps outlined in this guide, you can efficiently create and update subscriptions, ensuring a smooth integration with Chargebee's robust platform.
Best Practices for Secure and Efficient Chargebee API Integration
- Secure API Keys: Always store your API keys securely and avoid hardcoding them in your scripts. Consider using environment variables or secure vaults.
- Handle Rate Limits: Implement rate limiting in your application to comply with Chargebee's API limits. This will help prevent service disruptions and ensure smooth operation.
- Standardize Data Fields: Ensure consistency in data fields across your application to maintain data integrity and simplify data management.
- Error Handling: Implement comprehensive error handling to manage API responses effectively. Refer to Chargebee's error handling documentation for guidance.
Leverage Endgrate for Streamlined Integration Solutions
While integrating Chargebee API can be straightforward, managing multiple integrations can become complex. Endgrate offers a unified API solution that simplifies integration processes across various platforms, including Chargebee. By using Endgrate, you can save time and resources, allowing you to focus on your core product development.
Explore how Endgrate can enhance your integration strategy by visiting Endgrate and discover the benefits of a streamlined integration experience.
Read More

Ready to get started?
