Using the Chargebee API to Get Invoices (with Javascript examples)
Introduction to Chargebee API for Invoice Management
Chargebee is a robust subscription billing and revenue management platform designed to streamline billing processes for SaaS and subscription-based businesses. It offers a comprehensive suite of tools to manage subscriptions, invoicing, payments, and more.
Integrating with Chargebee's API allows developers to automate and enhance billing operations, such as retrieving and managing invoices. For example, you can use the Chargebee API to fetch invoice details and integrate them into your financial reporting system, ensuring accurate and up-to-date billing information.
Setting Up Your Chargebee Test/Sandbox Account
Before you can start integrating with the Chargebee API, you'll need to set up a test or sandbox account. This allows you to experiment with API calls without affecting live data, ensuring a safe environment for development and testing.
Create a Chargebee Test Account
- Visit the Chargebee website and sign up for a free trial or demo account.
- Follow the on-screen instructions to complete the registration process. Once your account is created, you'll be directed to the Chargebee dashboard.
Generate API Keys for Chargebee Integration
Chargebee uses HTTP Basic authentication for API calls, where the username is your API key and the password is left empty. Follow these steps to generate your API keys:
- Log in to your Chargebee account and navigate to the Settings section.
- Under API Keys, click on Create API Key.
- Provide a descriptive name for your API key to easily identify it later.
- Click Create to generate the API key. Make sure to copy and store this key securely, as it will be used for authenticating your API requests.
Configure Chargebee API Access
Ensure that your API key has the necessary permissions to access invoice data:
- Go to Settings > API Keys and select the API key you created.
- Under Permissions, ensure that the key has access to Invoices and any other resources you plan to interact with.
Test Your Chargebee API Setup
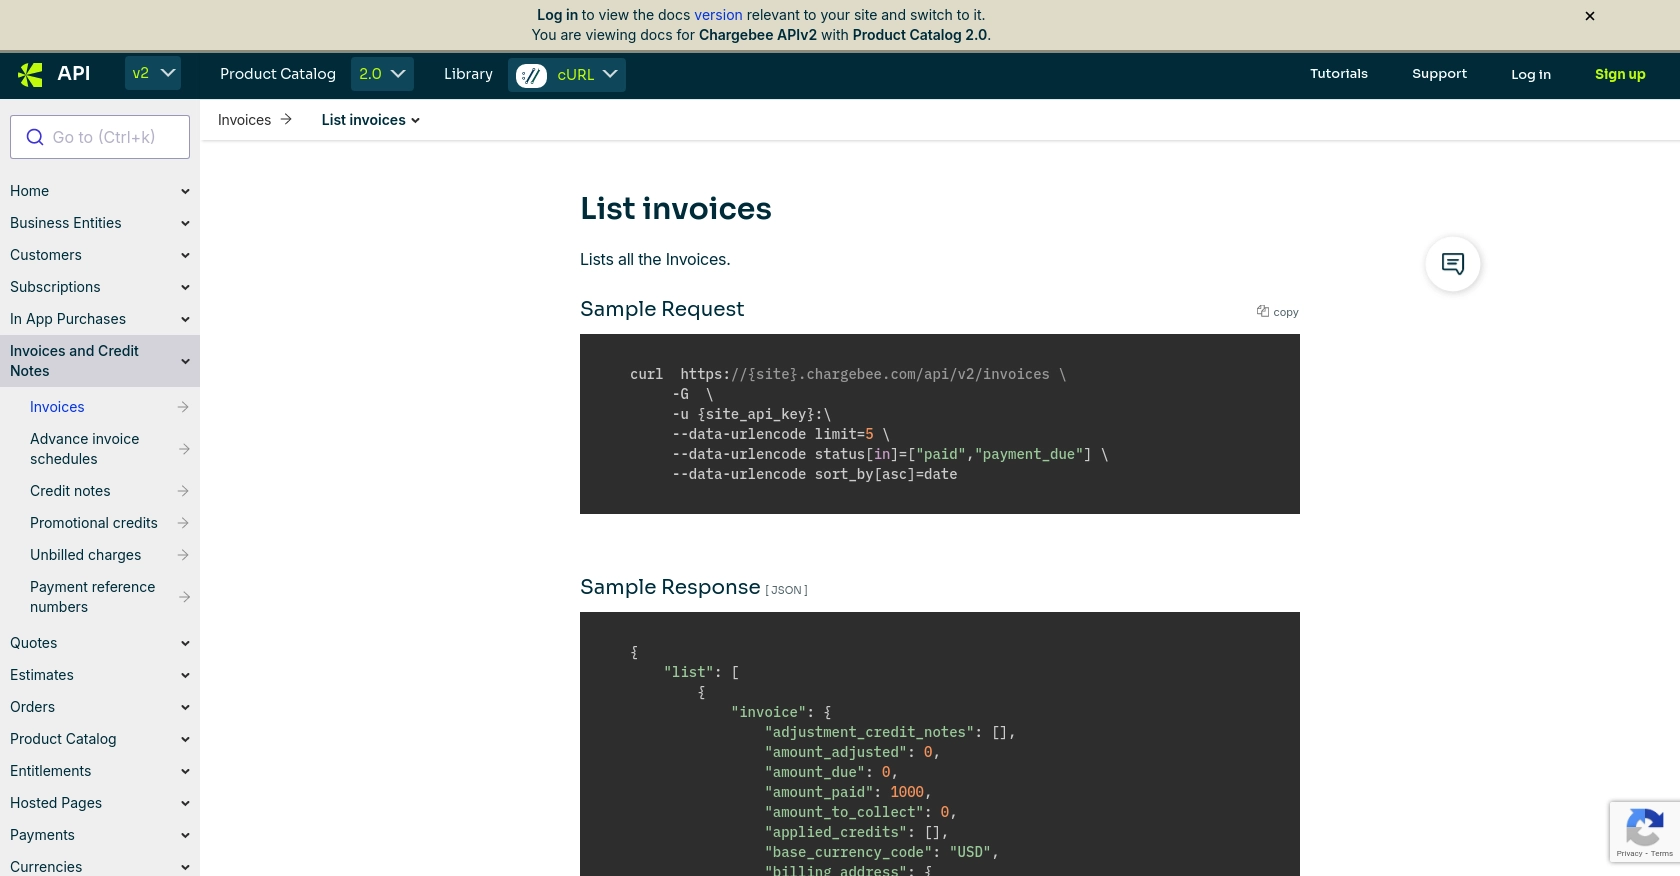
To verify that your setup is correct, you can make a simple API call to list invoices:
const axios = require('axios');

const site = 'your-site';
const apiKey = 'your-api-key';

axios.get(`https://${site}.chargebee.com/api/v2/invoices`, {
    auth: {
        username: apiKey,
        password: ''
    }
})
.then(response => {
    console.log('Invoices:', response.data);
})
.catch(error => {
    console.error('Error fetching invoices:', error);
});
Replace your-site and your-api-key with your Chargebee site name and API key. This code uses the axios library to make an authenticated request to the Chargebee API, retrieving a list of invoices.
sbb-itb-96038d7
Making API Calls to Retrieve Invoices Using Chargebee API with JavaScript
To interact with the Chargebee API and retrieve invoice data, you'll need to set up your development environment with the necessary tools and libraries. This section will guide you through the process of making API calls using JavaScript, specifically with the axios library.
Setting Up Your JavaScript Environment for Chargebee API Integration
Before making API calls, ensure you have Node.js installed on your machine. You'll also need to install the axios library, which simplifies HTTP requests.
- Install Node.js from the official website if you haven't already.
- Open your terminal and run the following command to install
axios:
npm install axiosWriting JavaScript Code to Fetch Invoices from Chargebee
With your environment set up, you can now write the JavaScript code to fetch invoices from Chargebee. The following example demonstrates how to make a GET request to the Chargebee API to retrieve a list of invoices:
const axios = require('axios');

const site = 'your-site';
const apiKey = 'your-api-key';

axios.get(`https://${site}.chargebee.com/api/v2/invoices`, {
    auth: {
        username: apiKey,
        password: ''
    }
})
.then(response => {
    console.log('Invoices:', response.data);
})
.catch(error => {
    console.error('Error fetching invoices:', error);
});
Replace your-site and your-api-key with your Chargebee site name and API key. This code uses the axios library to make an authenticated request to the Chargebee API, retrieving a list of invoices.
Understanding the Chargebee API Response and Error Handling
Upon a successful request, the Chargebee API will return a JSON response containing invoice data. You can access this data through the response.data object in your code. If an error occurs, it will be caught in the catch block, where you can handle it appropriately.
Common error codes include:
- 401 Unauthorized: Indicates an issue with authentication, such as an incorrect API key.
- 404 Not Found: The requested resource could not be found.
- 429 Too Many Requests: Rate limits have been exceeded. Chargebee's rate limit for live sites is approximately 150 API calls per minute.
For more detailed error handling, refer to the Chargebee API documentation.
Verifying API Call Success in Chargebee Sandbox
After making the API call, verify the success by checking the returned data against your Chargebee sandbox account. Ensure that the invoices listed in the response match those in your test environment.
Conclusion and Best Practices for Using Chargebee API with JavaScript
Integrating Chargebee's API into your JavaScript applications can significantly enhance your billing and invoicing processes. By automating these tasks, you can ensure more accurate and timely financial management, which is crucial for SaaS and subscription-based businesses.
Best Practices for Secure and Efficient Chargebee API Integration
- Secure API Keys: Store your API keys securely and avoid hardcoding them in your source files. Consider using environment variables or secure vaults.
- Handle Rate Limits: Be mindful of Chargebee's rate limits, which are approximately 150 requests per minute for live sites. Implement retry logic with exponential backoff to handle rate limit errors gracefully.
- Data Standardization: Ensure that data retrieved from Chargebee is standardized and transformed as needed for your application, maintaining consistency across systems.
- Error Handling: Implement robust error handling to manage API errors effectively. Log errors for monitoring and debugging purposes.
Streamline Your Integration Process with Endgrate
While integrating Chargebee's API can be highly beneficial, it can also be time-consuming and complex. Endgrate offers a solution by providing a unified API endpoint that connects to multiple platforms, including Chargebee. This allows you to focus on your core product while outsourcing the integration process, saving time and resources.
With Endgrate, you can build once for each use case and leverage an intuitive integration experience for your customers. Explore how Endgrate can simplify your integration needs by visiting Endgrate.
Read More

Ready to get started?
