Using the Active Campaign API to Create Or Update Contacts (with Python examples)
Introduction to Active Campaign API Integration
Active Campaign is a powerful marketing automation platform that offers a suite of tools to help businesses manage customer relationships and enhance their marketing strategies. With features like email marketing, CRM, and sales automation, Active Campaign is a popular choice for businesses looking to streamline their marketing efforts.
Developers may want to integrate with Active Campaign's API to automate contact management and enhance customer engagement. For example, using the Active Campaign API, developers can create or update contact information programmatically, ensuring that customer data is always up-to-date and accurate.
This article will guide you through using Python to interact with the Active Campaign API, focusing on creating and updating contacts efficiently. By following this tutorial, you'll learn how to leverage the API to automate contact management tasks, saving time and improving data accuracy.
Setting Up Your Active Campaign Test or Sandbox Account
Before you can start integrating with the Active Campaign API, you'll need to set up a test or sandbox account. This will allow you to safely experiment with the API without affecting your live data.
Creating an Active Campaign Account
If you don't already have an Active Campaign account, you can sign up for a free trial on their website. This trial will give you access to the full suite of features, allowing you to explore the platform's capabilities.
- Visit the Active Campaign website and click on the "Start Your Free Trial" button.
- Fill out the registration form with your details and submit it to create your account.
- Once your account is created, you'll receive a confirmation email. Follow the instructions in the email to verify your account.
Accessing the Developer Settings for API Integration
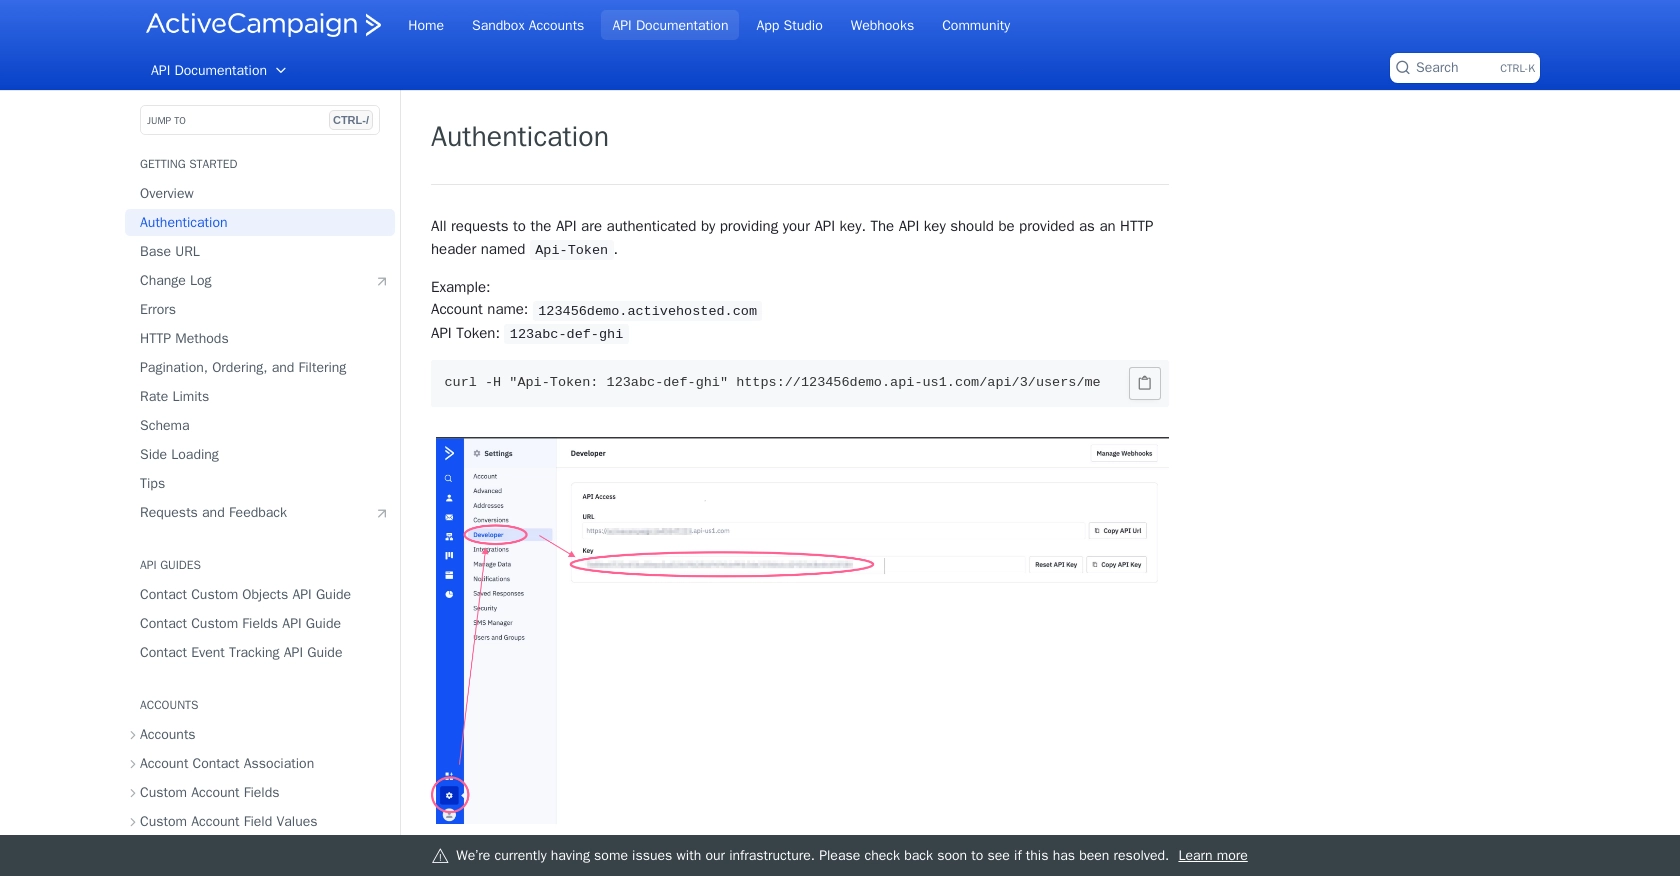
After setting up your account, you'll need to access the developer settings to obtain your API key and base URL, which are essential for authentication.
- Log in to your Active Campaign account and navigate to the "Settings" page.
- Under the "Developer" tab, you'll find your unique API key and base URL. Make sure to keep these credentials secure, as they are necessary for API access.
Understanding Active Campaign's Custom Authentication
The Active Campaign API uses a custom authentication method that requires an API key. This key should be included in the HTTP header of your requests as "Api-Token".
headers = {
    "Api-Token": "your_api_key_here",
    "Content-Type": "application/json"
}
Replace your_api_key_here with the API key you obtained from the developer settings.
Creating an App for OAuth-Based Authentication
Although Active Campaign primarily uses API key-based authentication, if your integration requires OAuth, you'll need to create an app within your account.
- Navigate to the "Apps" section under the "Integrations" tab.
- Click on "Create an App" and fill in the necessary details, such as the app name and redirect URL.
- Once the app is created, you'll receive a client ID and client secret, which you'll use to authenticate users via OAuth.
With your test account and API credentials set up, you're now ready to start making API calls to create or update contacts using Python. In the next section, we'll walk through the process of making these API calls.
sbb-itb-96038d7
Making API Calls to Create or Update Contacts in Active Campaign Using Python
To interact with the Active Campaign API for creating or updating contacts, you'll need to use Python. This section will guide you through the necessary steps, including setting up your environment, writing the code, and handling responses.
Setting Up Your Python Environment for Active Campaign API Integration
Before making API calls, ensure you have Python installed on your machine. This tutorial uses Python 3.11.1. Additionally, you'll need the requests library to handle HTTP requests.
pip install requestsCreating a New Contact with Active Campaign API
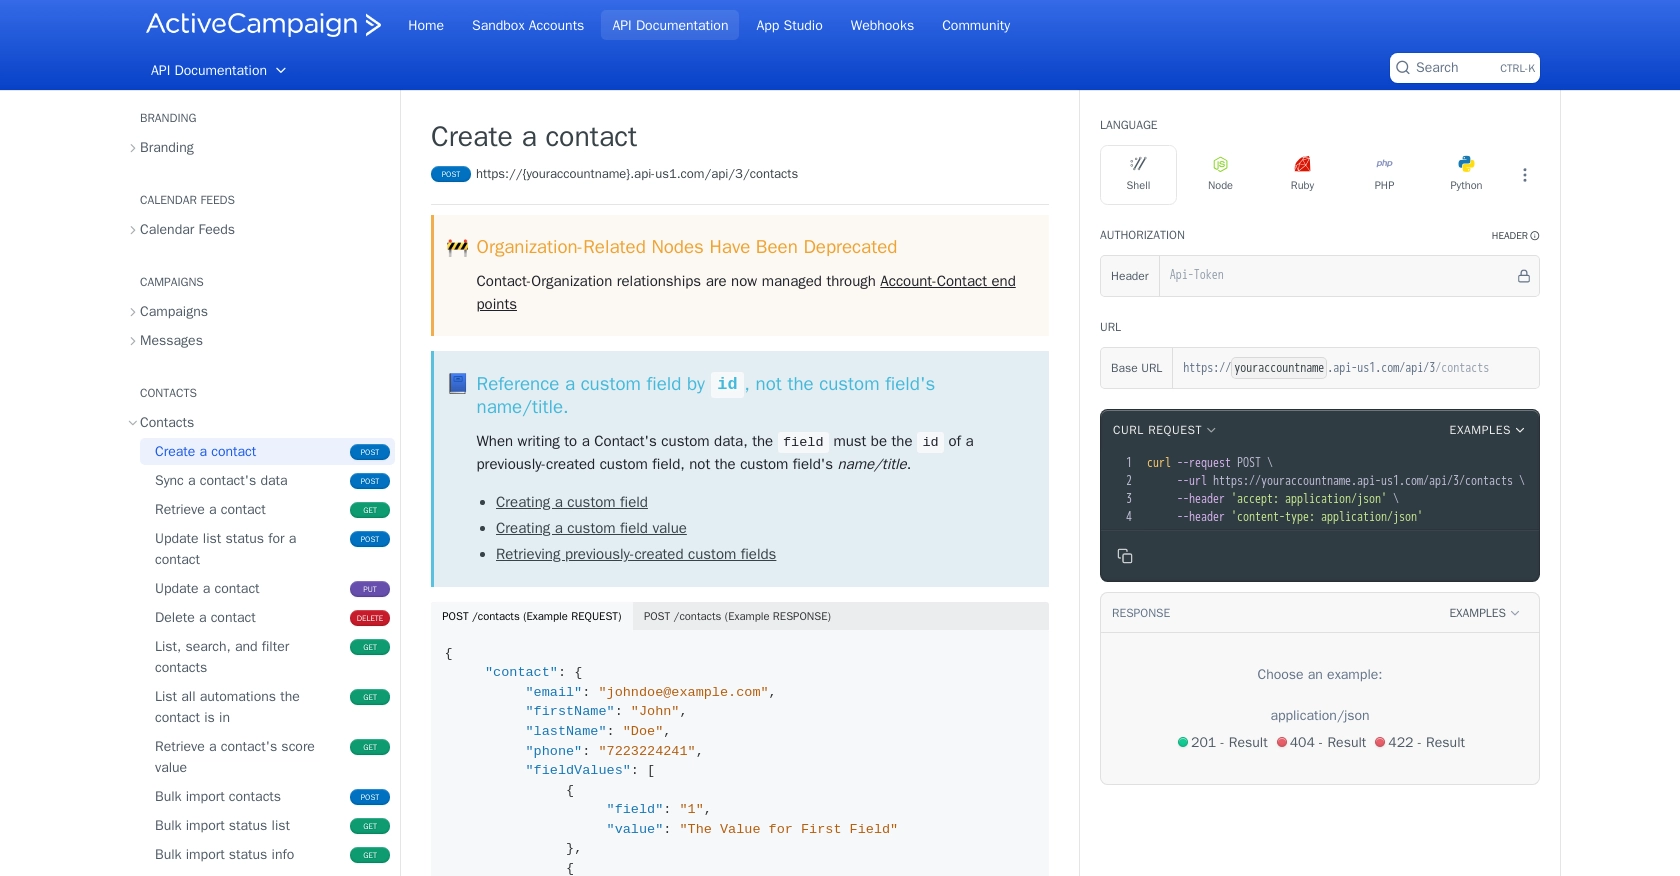
To create a new contact, you'll use the POST method to send data to the Active Campaign API. Here's how you can do it:
import requests

# Define the API endpoint and headers
url = "https://youraccountname.api-us1.com/api/3/contacts"
headers = {
    "Api-Token": "your_api_key_here",
    "Content-Type": "application/json"
}

# Define the contact data
contact_data = {
    "contact": {
        "email": "johndoe@example.com",
        "firstName": "John",
        "lastName": "Doe",
        "phone": "7223224241",
        "fieldValues": [
            {"field": "1", "value": "The Value for First Field"},
            {"field": "6", "value": "2008-01-20"}
        ]
    }
}

# Make the POST request
response = requests.post(url, json=contact_data, headers=headers)

# Check if the request was successful
if response.status_code == 201:
    print("Contact created successfully:", response.json())
else:
    print("Failed to create contact:", response.json())
Replace your_api_key_here with your actual API key. The response will include the contact details if successful.
Updating an Existing Contact with Active Campaign API
To update an existing contact, use the PUT method. You'll need the contact's ID to specify which contact to update:
import requests

# Define the API endpoint and headers
contact_id = "113"  # Replace with the actual contact ID
url = f"https://youraccountname.api-us1.com/api/3/contacts/{contact_id}"
headers = {
    "Api-Token": "your_api_key_here",
    "Content-Type": "application/json"
}

# Define the updated contact data
updated_contact_data = {
    "contact": {
        "email": "johndoe@example.com",
        "firstName": "John",
        "lastName": "Doe",
        "fieldValues": [
            {"field": "1", "value": "Updated Value for First Field"},
            {"field": "6", "value": "2008-01-20"}
        ]
    }
}

# Make the PUT request
response = requests.put(url, json=updated_contact_data, headers=headers)

# Check if the request was successful
if response.status_code == 200:
    print("Contact updated successfully:", response.json())
else:
    print("Failed to update contact:", response.json())
Ensure you replace your_api_key_here and contact_id with your actual API key and the contact ID you wish to update.
Handling API Responses and Errors
When making API calls, it's crucial to handle responses and potential errors. The Active Campaign API will return different status codes based on the outcome:
- 201 Created: The contact was successfully created.
- 200 OK: The contact was successfully updated.
- 404 Not Found: The specified contact ID does not exist.
- 422 Unprocessable Entity: The request was well-formed but could not be processed due to semantic errors.
Always check the response status code and handle errors appropriately to ensure robust integration.
For more details on API calls, refer to the official documentation: Create a New Contact and Update a Contact.
Best Practices for Active Campaign API Integration
When integrating with the Active Campaign API, it's essential to follow best practices to ensure a secure and efficient implementation. Here are some recommendations:
- Secure API Credentials: Always keep your API key confidential. Avoid exposing it in client-side code or public repositories.
- Handle Rate Limits: Active Campaign imposes a rate limit of 5 requests per second per account. Implement logic to handle rate limiting gracefully, such as retry mechanisms or request throttling. For more details, refer to the rate limits documentation.
- Data Standardization: Ensure that data fields are standardized and validated before sending requests to the API. This helps maintain data integrity and prevents errors.
- Error Handling: Implement robust error handling to manage different response codes and scenarios. This ensures that your integration can handle failures gracefully and provide meaningful feedback to users.
Leveraging Endgrate for Seamless API Integrations
If managing multiple integrations is becoming a challenge, consider using Endgrate to streamline the process. Endgrate offers a unified API endpoint that connects to various platforms, including Active Campaign, allowing you to build integrations once and deploy them across multiple services.
By using Endgrate, you can focus on your core product while outsourcing the complexities of integration management. This not only saves time and resources but also enhances the integration experience for your customers.
Explore how Endgrate can simplify your integration needs by visiting Endgrate's website.
By following these best practices and leveraging tools like Endgrate, you can ensure a successful and efficient integration with the Active Campaign API, enhancing your application's capabilities and improving customer engagement.
Read More
- https://endgrate.com/provider/activecampaign
- https://developers.activecampaign.com/reference/authentication
- https://developers.activecampaign.com/reference/url
- https://developers.activecampaign.com/reference/pagination
- https://developers.activecampaign.com/reference/rate-limits
- https://developers.activecampaign.com/reference/create-a-new-contact
- https://developers.activecampaign.com/reference/update-a-contact-new

Ready to get started?
