Using the Chargebee API to Create or Update Invoices (with PHP examples)
Introduction to Chargebee API for Invoice Management
Chargebee is a comprehensive subscription billing and revenue management platform designed to streamline financial operations for businesses. It offers a robust API that allows developers to automate and manage billing processes, including creating and updating invoices, handling subscriptions, and managing customer data.
Integrating with Chargebee's API can significantly enhance a business's financial operations by automating invoice creation and updates. For example, a developer might use the Chargebee API to automatically generate invoices for recurring subscriptions or apply discounts and credits to existing invoices, ensuring accurate and timely billing.
This article will guide you through using PHP to interact with the Chargebee API for creating or updating invoices, providing step-by-step instructions and code examples to help you efficiently manage your billing processes.
Setting Up Your Chargebee Test/Sandbox Account
Before you can start using the Chargebee API to create or update invoices, you'll need to set up a test or sandbox account. This will allow you to safely experiment with the API without affecting your live data.
Creating a Chargebee Test Account
If you don't already have a Chargebee account, follow these steps to create a test account:
- Visit the Chargebee signup page and register for a free account.
- Once registered, log in to your Chargebee dashboard.
- Navigate to the "Sites" section and create a new test site. This will serve as your sandbox environment.
Generating API Keys for Chargebee
Chargebee uses HTTP Basic authentication for API calls, where the username is your API key and the password is left empty. Follow these steps to generate your API keys:
- In your Chargebee dashboard, go to the "Settings" section.
- Select "API Keys" under the "Configure Chargebee" menu.
- Click on "Create a Key" and choose the appropriate permissions for your use case.
- Copy the generated API key and store it securely, as you'll need it to authenticate your API requests.
Configuring OAuth for Chargebee API Access
While Chargebee primarily uses API keys, you may also configure OAuth for more advanced authentication scenarios:
- Navigate to the "OAuth Apps" section in your Chargebee dashboard.
- Click on "Create an App" and fill in the required details, such as the app name and redirect URL.
- Once created, you'll receive a client ID and client secret. Use these credentials to authenticate users via OAuth.
With your Chargebee test account and API keys set up, you're now ready to start integrating with the Chargebee API using PHP. In the next section, we'll explore how to make API calls to create or update invoices.
sbb-itb-96038d7
Making API Calls to Chargebee for Invoice Management Using PHP
To interact with the Chargebee API for creating or updating invoices, you'll need to use PHP to make HTTP requests. This section will guide you through the necessary steps, including setting up your PHP environment, writing the code, and handling responses.
Setting Up Your PHP Environment for Chargebee API Integration
Before making API calls, ensure your PHP environment is properly configured:
- Install PHP version 7.4 or higher.
- Ensure the
cURLextension is enabled, as it is required for making HTTP requests. - Install Composer, a dependency manager for PHP, to manage any additional libraries you might need.
Installing Required PHP Libraries for Chargebee API
To simplify HTTP requests, you can use the Guzzle library. Install it using Composer:
composer require guzzlehttp/guzzleCreating or Updating Invoices with Chargebee API in PHP
Below is a sample PHP script to create or update an invoice using the Chargebee API:
require 'vendor/autoload.php';
use GuzzleHttp\Client;
$client = new Client();
$apiKey = 'your_api_key';
$site = 'your_site';
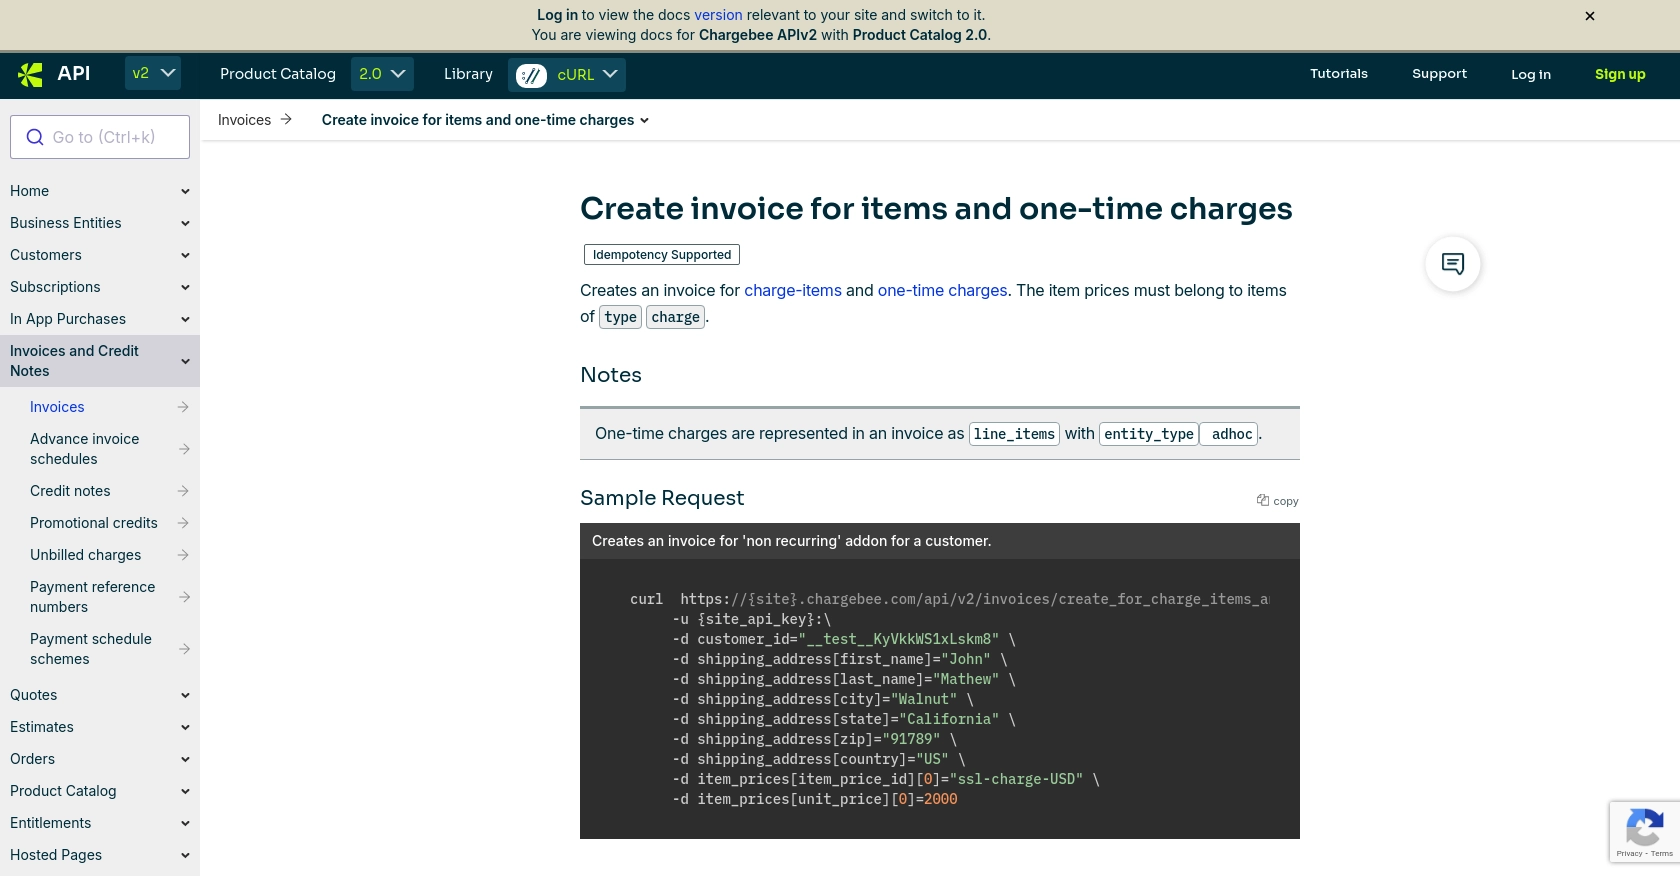
$response = $client->request('POST', "https://{$site}.chargebee.com/api/v2/invoices/create_for_charge_items_and_charges", [
'auth' => [$apiKey, ''],
'form_params' => [
'customer_id' => '__test__KyVkkWS1xLskm8',
'item_prices[item_price_id][0]' => 'ssl-charge-USD',
'item_prices[unit_price][0]' => 2000,
'shipping_address[first_name]' => 'John',
'shipping_address[last_name]' => 'Mathew',
'shipping_address[city]' => 'Walnut',
'shipping_address[state]' => 'California',
'shipping_address[zip]' => '91789',
'shipping_address[country]' => 'US'
]
]);
$data = json_decode($response->getBody(), true);
echo "Invoice ID: " . $data['invoice']['id'];
Handling Chargebee API Responses and Errors in PHP
After making an API call, it's crucial to handle the response and any potential errors:
- Check the HTTP status code to determine if the request was successful. A 2XX status indicates success.
- If the request fails, handle errors based on the status code and error message provided in the response. For example, a 404 error indicates a resource was not found.
Here's an example of error handling:
try {
    $response = $client->request('POST', $url, $options);
    $data = json_decode($response->getBody(), true);
    echo "Invoice ID: " . $data['invoice']['id'];
} catch (\GuzzleHttp\Exception\RequestException $e) {
    if ($e->hasResponse()) {
        $error = json_decode($e->getResponse()->getBody(), true);
        echo "Error: " . $error['message'];
    } else {
        echo "Request failed: " . $e->getMessage();
    }
}
Verifying Invoice Creation in Chargebee Sandbox
After executing the script, verify the invoice creation by checking your Chargebee sandbox account. Navigate to the "Invoices" section to confirm the new invoice appears as expected.
By following these steps, you can effectively manage invoices using the Chargebee API with PHP, ensuring streamlined and automated billing processes.
Conclusion and Best Practices for Using Chargebee API with PHP
Integrating the Chargebee API into your PHP applications can significantly enhance your billing and invoicing processes, providing automation and efficiency. By following the steps outlined in this guide, you can effectively create and update invoices, ensuring accurate financial management.
Best Practices for Secure and Efficient Chargebee API Integration
- Secure API Keys: Store your Chargebee API keys securely and avoid hardcoding them in your source code. Use environment variables or secure vaults to manage sensitive information.
- Handle Rate Limits: Be aware of Chargebee's API rate limits to prevent throttling. Implement exponential backoff strategies for retrying failed requests. For more details, refer to the Chargebee API documentation on error handling and rate limits.
- Data Standardization: Ensure consistent data formats when interacting with the API, especially for currency and date fields, to avoid errors and discrepancies.
- Error Handling: Implement robust error handling to manage API response errors gracefully. Use the error codes provided by Chargebee to guide your error management strategies.
Streamlining Your Integration with Endgrate
While integrating with Chargebee's API can be straightforward, managing multiple integrations can become complex. Consider using Endgrate to simplify your integration processes. Endgrate offers a unified API endpoint that connects to multiple platforms, allowing you to build once and deploy across various services. This approach saves time and resources, enabling you to focus on your core product development.
Explore how Endgrate can enhance your integration strategy by visiting Endgrate's website.
By adhering to these best practices and leveraging tools like Endgrate, you can ensure a seamless and efficient integration experience with Chargebee, enhancing your business's billing operations.
Read More
- https://endgrate.com/provider/chargebee
- https://apidocs.chargebee.com/docs/api/
- https://apidocs.chargebee.com/docs/api/auth?lang=curl
- https://apidocs.chargebee.com/docs/api/error-handling?lang=curl
- https://apidocs.chargebee.com/docs/api/invoices?lang=curl#create_invoice_for_items_and_one-time_charges

Ready to get started?
