Using the Klaviyo API to Create or Update Profiles in Python
Introduction to Klaviyo API for Profile Management
Klaviyo is a powerful email and SMS marketing platform that leverages data science to deliver personalized marketing experiences. It offers a robust API that allows developers to seamlessly integrate Klaviyo's capabilities into their applications, enabling businesses to enhance their marketing strategies through data-driven insights.
Developers might want to connect with Klaviyo to manage customer profiles effectively. By using the Klaviyo API, you can create or update customer profiles, ensuring that your marketing campaigns are always targeting the right audience with the most up-to-date information.
For example, a developer could use the Klaviyo API to automatically update customer profiles with new purchase data from an e-commerce platform, allowing for more personalized follow-up marketing efforts.
Setting Up Your Klaviyo Test Account for API Integration
Before you can start using the Klaviyo API to manage profiles, you'll need to set up a test account. This allows you to safely experiment with API calls without affecting live data. Follow these steps to get started:
Create a Klaviyo Account
- Visit the Klaviyo website and sign up for a free account if you don't already have one.
- Once registered, log in to your Klaviyo dashboard.
Generate Klaviyo API Credentials
To interact with the Klaviyo API, you'll need to obtain API credentials. Here's how:
- Navigate to the Account section in the top-right corner of the dashboard.
- Select Settings from the dropdown menu.
- Click on API Keys under the Settings menu.
- Click Create API Key and give it a descriptive name.
- Copy the generated private API key and store it securely. This key will be used to authenticate your API requests.
For more details, refer to the Klaviyo API documentation.
Understanding Klaviyo API Key Authentication
Klaviyo uses API key-based authentication to secure API requests. Ensure that your private API key is never exposed in client-side code or public repositories. For more information on API key scopes and security, visit the Klaviyo API authentication guide.
Test Your API Setup
With your API key ready, you can make a test API request to ensure everything is set up correctly:
import requests

url = "https://a.klaviyo.com/api/profiles/"
headers = {
    "Authorization": "Klaviyo-API-Key your-private-api-key",
    "Content-Type": "application/json"
}

response = requests.get(url, headers=headers)

if response.status_code == 200:
    print("API setup successful!")
else:
    print("Error:", response.status_code)
Replace your-private-api-key with your actual API key. This code snippet sends a request to the Klaviyo API to verify your setup. If successful, you should see a confirmation message.
sbb-itb-96038d7
How to Make API Calls to Create or Update Profiles Using Klaviyo API in Python
To effectively manage customer profiles with the Klaviyo API, you need to know how to make API calls for creating or updating profiles. This section will guide you through the process using Python, ensuring you have the right setup and understanding to execute these operations seamlessly.
Prerequisites for Using Python with Klaviyo API
Before diving into the code, ensure you have the following prerequisites:
- Python 3.11.1 installed on your machine.
- The Python package installer
pipto manage dependencies. - Install the
requestslibrary by running the command:
pip install requestsCreating a New Profile with Klaviyo API
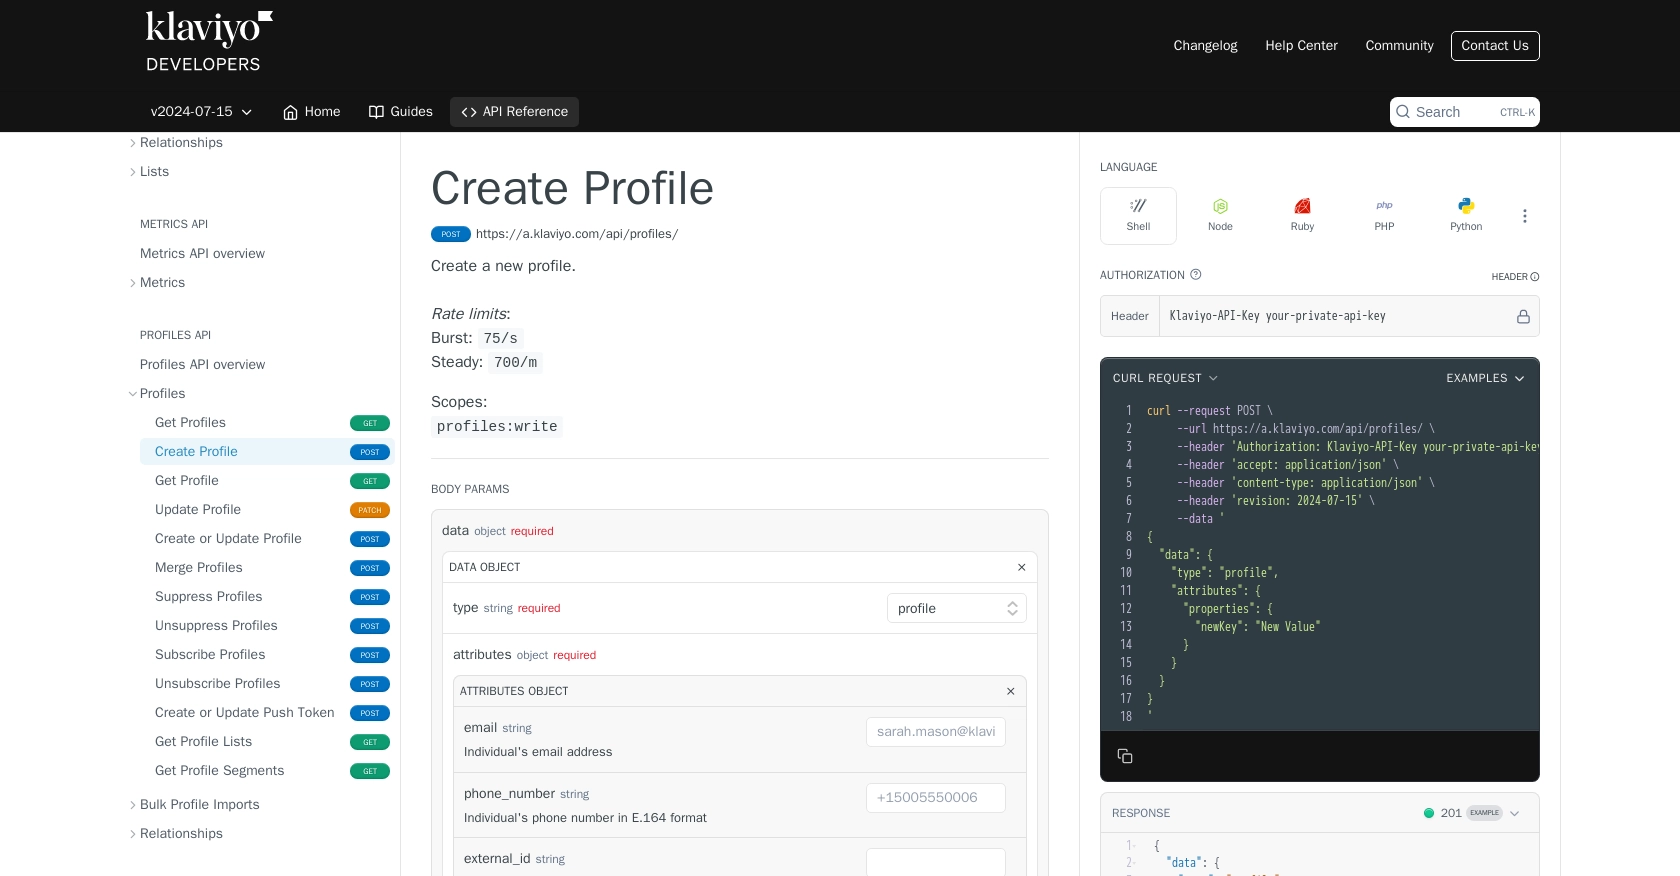
To create a new profile in Klaviyo, you'll use the POST method. Here's how you can do it:
import requests

url = "https://a.klaviyo.com/api/profiles/"
headers = {
    "Authorization": "Klaviyo-API-Key your-private-api-key",
    "Content-Type": "application/json",
    "revision": "2024-07-15"
}
data = {
    "data": {
        "type": "profile",
        "attributes": {
            "email": "example@domain.com",
            "first_name": "John",
            "last_name": "Doe"
        }
    }
}

response = requests.post(url, headers=headers, json=data)

if response.status_code == 201:
    print("Profile created successfully!")
else:
    print("Error:", response.status_code, response.json())
Replace your-private-api-key with your actual API key. This code snippet sends a request to create a new profile with basic attributes like email, first name, and last name. If successful, you'll receive a confirmation message.
Updating an Existing Profile with Klaviyo API
To update an existing profile, you'll use the PATCH method. Follow these steps:
import requests

profile_id = "your-profile-id"
url = f"https://a.klaviyo.com/api/profiles/{profile_id}/"
headers = {
    "Authorization": "Klaviyo-API-Key your-private-api-key",
    "Content-Type": "application/json",
    "revision": "2024-07-15"
}
data = {
    "data": {
        "type": "profile",
        "id": profile_id,
        "attributes": {
            "first_name": "Jane",
            "last_name": "Smith"
        }
    }
}

response = requests.patch(url, headers=headers, json=data)

if response.status_code == 200:
    print("Profile updated successfully!")
else:
    print("Error:", response.status_code, response.json())
Ensure you replace your-private-api-key and your-profile-id with your actual API key and the profile ID you wish to update. This code updates the first and last name of the specified profile.
Verifying API Call Success and Handling Errors
After making an API call, it's crucial to verify its success. Check the response status code:
201indicates a profile was created successfully.200indicates a profile was updated successfully.- For error handling, refer to the Klaviyo API documentation for detailed status codes and error descriptions.
Implement error handling to manage issues like rate limits or invalid requests. For instance, handle 429 errors by implementing a retry mechanism with exponential backoff.
Conclusion and Best Practices for Using Klaviyo API in Python
Integrating with the Klaviyo API allows developers to efficiently manage customer profiles, enhancing marketing strategies through personalized data insights. By following the steps outlined in this guide, you can create and update profiles seamlessly using Python.
Best Practices for Secure and Efficient API Integration with Klaviyo
- Secure API Credentials: Always store your private API keys securely and avoid exposing them in client-side code or public repositories.
- Handle Rate Limits: Klaviyo's API employs rate limits to maintain stability. Implement a retry mechanism with exponential backoff for handling
429errors. For more details, refer to the Klaviyo API rate limits documentation. - Data Standardization: Ensure consistent data formats for profile attributes to maintain data integrity across your applications.
Enhance Your Integration Experience with Endgrate
While integrating with Klaviyo is powerful, managing multiple integrations can be complex. Endgrate simplifies this process by offering a unified API endpoint for various platforms, including Klaviyo. By using Endgrate, you can:
- Save time and resources by outsourcing integrations and focusing on your core product.
- Build once for each use case instead of multiple times for different integrations.
- Provide an intuitive integration experience for your customers.
Explore how Endgrate can streamline your integration processes by visiting Endgrate.
Read More
- https://endgrate.com/provider/klaviyo
- https://developers.klaviyo.com/en/docs/get_started
- https://developers.klaviyo.com/en/docs/retrieve_api_credentials
- https://developers.klaviyo.com/en/docs/rate_limits_and_error_handling
- https://developers.klaviyo.com/en/reference/create_profile
- https://developers.klaviyo.com/en/reference/update_profile

Ready to get started?
